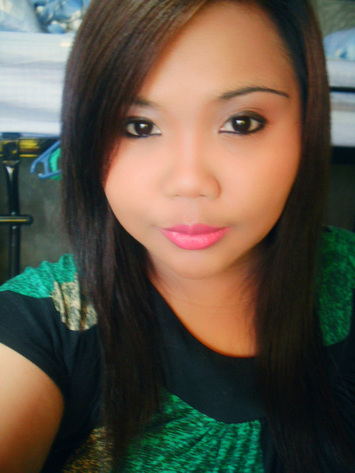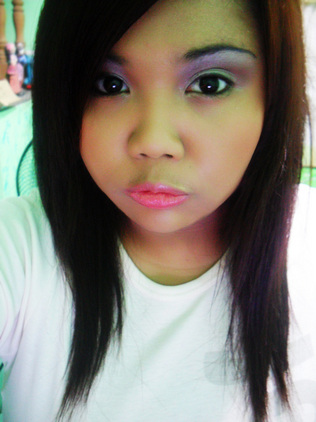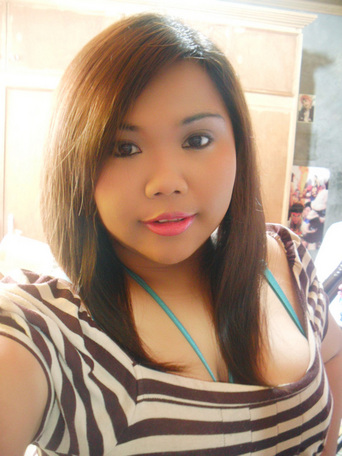
This look is more on the natural side since I'm going to the church and just a simple lunch out with my family. You can wear this makeup on those instances as well. Remember, unless you're going out on a night out or an event where you really need to dress up, stick to natural looking makeups. For a natural look, I often use brown and a soft pink or natural matte colored lipstick.
PRODUCTS USED:
FACE
- Garnier Whitening and Even Moisturizing Cream
- Neutrogena Healthy Skin Liquid Makeup (Honey Beige)
- Wish Pressed Powder (Beige)
- Clinique Pressed Powder Bronzer (True Bronze)
- Nichido Powder Blush (Cool Rum)
EYES
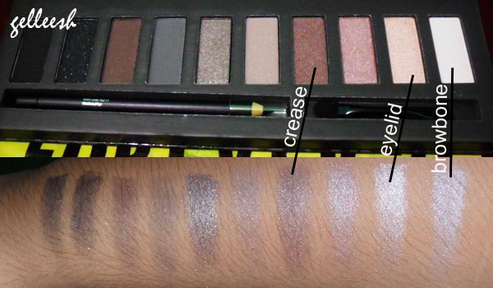
- Love & Beauty Smokey Palette (Darker Brown and White)
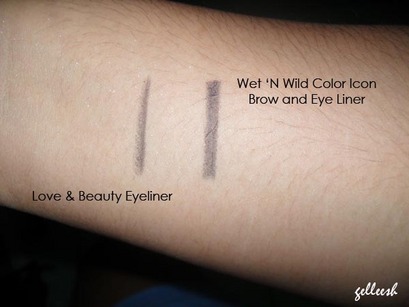
- Love & Beauty Brow and Eyeliner Pencil
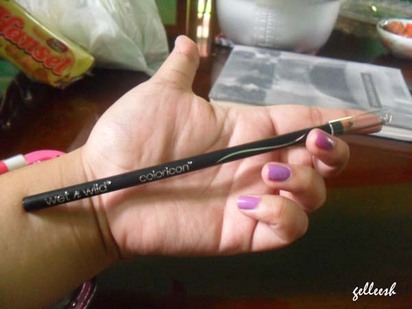
- Wet N Wild Color Icon Brown and Eyeliner Pencil
- L’Oreal Voluminous Naturale Mascara
LIPS
- Watsons Moisturizing Lip Balm (Strawberry)
- ELF Lipstick (Gypsy)
- Laura Mercier Lip Plumper (Wild Berry)
HOW I DID IT?
First I did was to apply the Garnier moisturizer and then applied the Neutrogena Healthy Skin Liquid Makeup (Honey Beige) using my Marionnaud N33 Foundation brush. I, then, used the Wish Pressed Powder (Beige) to set the foundation.
For the eyes, I applied a lighter shade of semi shimmer brown on my eyelids from the Love & Beauty Smokey Palette. After blending well, I applied a darker semi shimmer brown on my crease. Blend the colors well so they won't look rough and use white for the brow bone highlights. I used the Love and Beauty Liner for my brows and lengthened them a bit. I just added a thin black line on my lids using my Wet N Wild Color Icon liner and applied the L'Oreal Mascara on my upper and lower lashes.For my lips, I applied, using my pinky finger, the Watsons Moisturizing Lip Balm (Strawberry) and then put on the ELF Lipstick (Gypsy) on my upper and lower lip. To add a bit of a shine, I used a Laura Mercier Wild Berry Lip Plumper.
For my last touches, I applied the Nichido Powder Blush (Cool Rum) on my cheek bone going slantly upwards to create an illusion that my face is longer. Again, this technique is good for people with round faces like me. Then, I used the Marionnaud N37 Brush (originally an eye brush) to make a line on my nose to make it look thinner. I applied the Clinique Pressed Powder Bronzer (True Bronze) and then I applied white eyeshadow in the middle to highlight the line I made. Blend it well so as not to look weird.
To set the whole look together and create a matte finish, I applied Wish Pressed Powder (Beige) again using my ELF Total Face brush.
Of all my looks posted, this is actually my favorite. I love how I managed to create a natural and fresh look which made my lips stand out in a noticeable pinkish natural way and makes my eyes pop out its own natural beauty.
PRODUCTS USED:
FACE
- Garnier Whitening and Even Moisturizing Cream
- Neutrogena Healthy Skin Liquid Makeup (Honey Beige)
- Wish Pressed Powder (Beige)
- Clinique Pressed Powder Bronzer (True Bronze)
- Nichido Powder Blush (Cool Rum)
EYES
- Love & Beauty Smokey Palette (Darker Brown and White)
- Love & Beauty Brow and Eyeliner Pencil
- Wet N Wild Color Icon Brown and Eyeliner Pencil
- L’Oreal Voluminous Naturale Mascara
LIPS
- Watsons Moisturizing Lip Balm (Strawberry)
- ELF Lipstick (Gypsy)
- Laura Mercier Lip Plumper (Wild Berry)
HOW I DID IT?
First I did was to apply the Garnier moisturizer and then applied the Neutrogena Healthy Skin Liquid Makeup (Honey Beige) using my Marionnaud N33 Foundation brush. I, then, used the Wish Pressed Powder (Beige) to set the foundation.
For the eyes, I applied a lighter shade of semi shimmer brown on my eyelids from the Love & Beauty Smokey Palette. After blending well, I applied a darker semi shimmer brown on my crease. Blend the colors well so they won't look rough and use white for the brow bone highlights. I used the Love and Beauty Liner for my brows and lengthened them a bit. I just added a thin black line on my lids using my Wet N Wild Color Icon liner and applied the L'Oreal Mascara on my upper and lower lashes.For my lips, I applied, using my pinky finger, the Watsons Moisturizing Lip Balm (Strawberry) and then put on the ELF Lipstick (Gypsy) on my upper and lower lip. To add a bit of a shine, I used a Laura Mercier Wild Berry Lip Plumper.
For my last touches, I applied the Nichido Powder Blush (Cool Rum) on my cheek bone going slantly upwards to create an illusion that my face is longer. Again, this technique is good for people with round faces like me. Then, I used the Marionnaud N37 Brush (originally an eye brush) to make a line on my nose to make it look thinner. I applied the Clinique Pressed Powder Bronzer (True Bronze) and then I applied white eyeshadow in the middle to highlight the line I made. Blend it well so as not to look weird.
To set the whole look together and create a matte finish, I applied Wish Pressed Powder (Beige) again using my ELF Total Face brush.
Of all my looks posted, this is actually my favorite. I love how I managed to create a natural and fresh look which made my lips stand out in a noticeable pinkish natural way and makes my eyes pop out its own natural beauty.